

hexo-theme-butterfly 主题是基于 hexo-theme-melody 的基础上进行开发的。
Butterfly 主题安装
{% tabs test2 %}
在你的 Hexo 根目录里执行:
git clone -b master https://github.com/jerryc127/hexo-theme-butterfly.git themes/butterfly
升级方法:在主題目录下,进行 git pull
在你的 Hexo 根目录里执行:
git clone -b master https://gitee.com/immyw/hexo-theme-butterfly.git themes/butterfly
升级方法:在主題目录下,进行 git pull
此方法只支持 Hexo 5.0.0 以上版本
通过 npm 安装并不会在 themes 里生成主题文件夹,而是在 node_modules 里生成
在你的 Hexo 根目录里执行:
npm i hexo-theme-butterfly
升级方法:在 Hexo 根目录下,进行 npm update hexo-theme-butterfly
{% endtabs %}
应用主题
修改 Hexo 根目录下的 _config.yml,把主题改为 butterfly:
theme: butterfly
安装插件
如果你没有 pug 以及 stylus 的渲染器,请下载安装:
npm install hexo-renderer-pug hexo-renderer-stylus --save
升级建议
为了减少升级主题后带来的不便,请使用以下方法:
在 hexo 的根目录创建一个文件 _config.butterfly.yml,并把主题目录的 _config.yml 内容复制到 _config.butterfly.yml 去,以后只需要在 _config.butterfly.yml 进行配置就行。
- 鉴于每个人的根目录名称都不一样,本帖博客根目录一律以
[Blogroot]指代。- 本帖涉及魔改源码的内容,会使用 diff 代码块标识,复制时请不要忘记删除前面的 +、– 符号。
- 因为
.pug和.styl以及.yml等对缩进要求较为严格,请尽量 不要使用记事本等无法提供语法高亮的文本编辑器 进行修改。博主同款编辑器的安装配置教程请参看:Atom 插件安装和推荐- 本帖基于
Butterfly 主题进行魔改方案编写,因此请读者优先掌握 Butterfly 主题官方文档 的内容后再来进行魔改。以避免不必要的兼容性问题。
Butterfly 主题美化
生成文章唯一链接
Hexo的默认文章链接格式是年,月,日,标题这种格式来生成的。如果你的标题是中文的话,那你的URL链接就会包含中文,
复制后的URL路径就是把中文变成了一大堆字符串编码,如果你在其他地方用这边文章的url链接,偶然你又修改了改文章的标题,那这个URL链接就会失效。为了给每一篇文章来上一个属于自己的链接,写下此教程,利用 hexo-abbrlink 插件,A Hexo plugin to generate static post link based on post titles ,来解决这个问题。 参考github官方: hexo-abbrlink 按照此教程配置完之后如下:
1、安装插件,在博客根目录 [Blogroot] 下打开终端,运行以下指令:
npm install hexo-abbrlink --save
2、插件安装成功后,在根目录 [Blogroot] 的配置文件 _config.yml 找到 permalink:
- permalink: :year/:month/:day/:title/
#修改为
+   permalink: post/:abbrlink.html # post为自定义前缀
+ abbrlink:
+       alg: crc32   #算法: crc16(default) and crc32
+       rep: hex     #进制: dec(default) and hex
代码样式
代码块中的所有功能只适用于 Hexo 自带的代码渲染。如果使用第三方的渲染器,不一定会有效
代码高亮主题
Butterfly 支持6种代码高亮样式:
- darker
- pale night
- light
- ocean
- mac
- mac light
修改主题配置文件 _config.butterfly.yml
highlight_theme: mac
代码复制
主题支持代码复製功能
修改 主题配置文件
highlight_copy: true
代码高度限制
3.7.0 及以上支持
顶部图
| 配置 | 解释 |
|---|---|
| index_img | 主页的 top_img |
| default_top_img | 默认的 top_img,当页面的 top_img 没有配置时,会显示 default_top_img |
| archive_img | 归档页面的 top_img |
| tag_img | tag 子页面 的 默认 top_img |
| tag_per_img | tag 子页面的 top_img,可配置每个 tag 的 top_img |
| category_img | category 子页面 的 默认 top_img |
| category_per_img | category 子页面的 top_img,可配置每个 category 的 top_img |
修改主题配置文件 _config.butterfly.yml
index_img: xxx.png
其它页面 (tags/categories/自建页面)和文章页的 top_img ,请到对应的 md 页面设置 front-matter 中的 top_img
tag_per_img 和 category_per_img 是 3.2.0 新增的内容,可对 tag 和 category 进行单独的配置
并不推荐为每个 tag 和每个 category 都配置不同的顶部图,因为配置太多会拖慢生成速度
tag_per_img:
  aplayer: https://xxxxxx.png
  android: ddddddd.png

category_per_img:
  随想: hdhdh.png
  推荐: ddjdjdjd.png
footer 背景
修改主题配置文件 _config.butterfly.yml
# footer是否显示图片背景(与 top_img一致)
footer_bg: true
打字效果
打字效果 activate-power-mode
修改主题配置文件 _config.butterfly.yml
# Typewriter Effect (打字效果)
# https://github.com/disjukr/activate-power-mode
activate_power_mode:
  enable: true
  colorful: true # open particle animation (冒光特效)
  shake: true #  open shake (抖動特效)
  mobile: false
背景特效
{% tabs 背景特效 %}
好看的彩带背景,可設置每次刷新更換彩带,或者每次點擊更換彩带
修改主题配置文件 _config.butterfly.yml
canvas_ribbon:
  enable: false
  size: 150
  alpha: 0.6
  zIndex: -1
  click_to_change: false  #設置是否每次點擊都更換彩带
  mobile: false # false 手機端不顯示 true 手機端顯示
相关配置可查看 canvas_ribbon
好看的彩带背景,会飘动
修改主题配置文件 _config.butterfly.yml
canvas_fluttering_ribbon:
  enable: true
  mobile: true # false 手机端不显示 true 手机端显示
修改主题配置文件 _config.butterfly.yml
canvas_nest:
  enable: true
  color: '0,0,255' #color of lines, default: '0,0,0'; RGB values: (R,G,B).(note: use ',' to separate.)
  opacity: 0.7 # the opacity of line (0~1), default: 0.5.
  zIndex: -1 # z-index property of the background, default: -1.
  count: 99 # the number of lines, default: 99.
  mobile: false # false 手機端不顯示 true 手機端顯示
{% endtabs %}
鼠标点击效果
{% tabs test1 %}
zIndex建议只在-1和9999上选
-1 代表烟火效果在底部
9999 代表烟火效果在前面
修改主题配置文件 _config.butterfly.yml
fireworks:
  enable: true
  zIndex: 9999 # -1 or 9999
  mobile: false
修改主题配置文件 _config.butterfly.yml
# 点击出現爱心
click_heart:
  enable: true
  mobile: false

修改主题配置文件 _config.butterfly.yml
# 点击出现文字,文字可自行修改
ClickShowText:
  enable: false
  text:
    - I
    - LOVE
    - YOU
  fontSize: 15px
  random: false # 文字随机显示
  mobile: false
{% endtabs %}
网站副标题
可设置主页中展示的网站副标题或者自己喜欢的座右铭
修改主题配置文件 _config.butterfly.yml
# Site
title: Hexo
subtitle:
  enable: true
  # Typewriter Effect (打字效果)
  effect: true
  # loop (循環打字)
  loop: true
  # source 調用第三方服務
  # source: false 關閉調用
  # source: 1  調用一言網的一句話(簡體) https://hitokoto.cn/
  # source: 2  調用一句網(簡體) http://yijuzhan.com/
  # source: 3  調用今日詩詞(簡體) https://www.jinrishici.com/
  # subtitle 會先顯示 source , 再顯示 sub 的內容
  # source: 3
  # 如果關閉打字效果,subtitle 只會顯示 sub 的第一行文字
  sub:
    - 我双手合十的愿望里永远有你。
    - 穿越人海,只为与你相拥。
    - 手握日月摘 ♥ 陈。
预览见本站主页:haiyong.site
侧边栏设置
侧边排版
可自行决定哪个项目需要显示,可决定位置,也可以设置不显示侧边栏。
修改主题配置文件 _config.butterfly.yml
aside:
  enable: true
  hide: false
  button: true
  mobile: false # display on mobile
  position: right # left or right
  card_author:
    enable: true
    description: 手握日月摘心陈
    button:
      enable: true
      icon: iconfont icon-youxishoubing
      text: 摸鱼
      link: https://haiyong.site/moyu/
  card_announcement:
    enable: true
    content:
      <b><font color="#e66b6d">双</font> <font color="#e66d98">手</font> <font color="#e66cc6">合</font> <font color="#cc6de6">十</font> <font color="#9770e6">成</font> <font color="#6d93e6">为</font> <font color="#6fcde6">自</font> <font color="#72e6b6">己</font> <font color="#72e689">的</font> <font color="#99e670">神</font>, <font color="#cde670">自</font> <font color="#e6df72">己</font> <font color="#e6c073">所</font> <font color="#e6a271">信</font> <font color="#e6796f">念</font> <font color="#e65454">的</font> <font color="#e63333">即</font> <font color="#e62c2c">是</font> <font color="#e60101">信</font> <font color="#e60101">仰</font></b>
      <p align="center"><img src="https://blog.haiyong.site/img/img-blog.csdnimg.cn/f7384c88956d4378b72e47548e19c9f8.gif" width="50" alt="mao"></p>
      <p align="center">微信号:wh18363</p>
      <p align="center">QQ号:1836360247</p>
  card_recent_post:
    enable: true
    limit: 5 # if set 0 will show all
    sort: date # date or updated
    sort_order: # Don't modify the setting unless you know how it works
  card_categories:
    enable: true
    limit: 8 # if set 0 will show all
    expand: none # none/true/false
    sort_order: # Don't modify the setting unless you know how it works
  card_tags:
    enable: true
    limit: 40 # if set 0 will show all
    color: true
    sort_order: # Don't modify the setting unless you know how it works
  card_archives:
    enable: true
    type: monthly # yearly or monthly
    format: MMMM YYYY # eg: YYYY年MM月
    order: -1 # Sort of order. 1, asc for ascending; -1, desc for descending
    limit: 8 # if set 0 will show all
    sort_order: # Don't modify the setting unless you know how it works
  card_webinfo:
    enable: true
    post_count: true
    last_push_date: true
    sort_order: # Don't modify the setting unless you know how it works
  card_tags color: true
访问人数 busuanzi (UV 和 PV)
访问 busuanzi 的官方网站查看更多的介绍。
修改主题配置文件 _config.butterfly.yml
busuanzi:
  site_uv: true
  site_pv: true
  page_pv: true
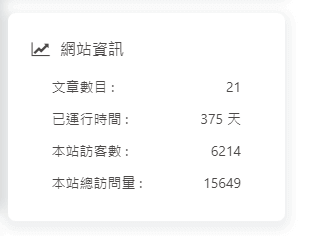
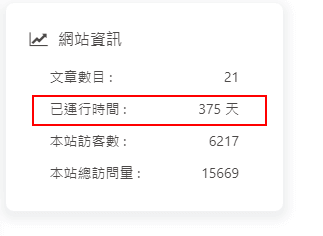
运行时间
网页已运行时间
修改主题配置文件 _config.butterfly.yml
runtimeshow:
  enable: true
  publish_date: 6/7/2018 00:00:00
  ##网页开通时间
  #格式: 月/日/年 时间
  #也可以写成 年/月/日 时间
侧边栏时钟 (转载自:安知鱼)
1、如果有安装店长的插件版侧边栏电子钟(与店长的电子钟冲突),在博客根目录[Blogroot]下打开终端,运行以下指令
# 卸载原版电子钟
npm uninstall hexo-butterfly-clock
2、安装插件,在博客根目录[Blogroot]下打开终端,运行以下指令:
npm install hexo-butterfly-clock-anzhiyu --save
3、添加配置信息,以下为写法示例在站点配置文件_config.yml或者主题配置文件_config.butterfly.yml中添加
# electric_clock
# see https://anzhiy.cn/posts/fc18.html
electric_clock:
  enable: true # 开关
  priority: 5 #过滤器优先权
  enable_page: all # 应用页面
  exclude:
  # - /posts/
  # - /about/
  layout: # 挂载容器类型
    type: class
    name: sticky_layout
    index: 0
  loading: https://cdn.cbd.int/hexo-butterfly-clock-anzhiyu/lib/loading.gif #加载动画自定义
  clock_css: https://cdn.cbd.int/hexo-butterfly-clock-anzhiyu/lib/clock.min.css
  clock_js: https://cdn.cbd.int/hexo-butterfly-clock-anzhiyu/lib/clock.min.js
  ip_api: https://widget.qweather.net/simple/static/js/he-simple-common.js?v=2.0
  qweather_key: # 和风天气key
  gaud_map_key: # 高得地图web服务key
  default_rectangle: false # 开启后将一直显示rectangle位置的天气,否则将获取访问者的地理位置与天气
  rectangle: 112.982279,28.19409 # 获取访问者位置失败时会显示该位置的天气,同时该位置为开启default_rectangle后的位置
其中 qweather_key 和 gaud_map_key 最好自己去申请对应的 api key,默认使用安知鱼的,可能会被限制,不保证可靠性
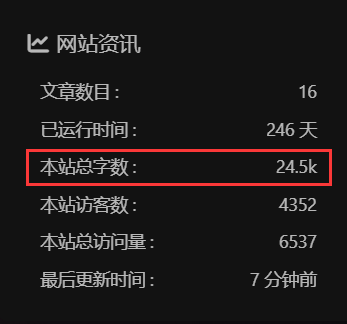
字数统计
要为 Butterfly 配上字数统计特性, 你需要如下几个步骤:
-
打开 hexo 工作目录
-
npm install hexo-wordcount –save or yarn add hexo-wordcount
-
修改主题配置文件
_config.butterfly.yml
wordcount:
  enable: true
  post_wordcount: true
  min2read: true
  total_wordcount: true
公告2个小人
1、在 Butterfly/layout/includes/widget/card_announcement.pug 下添加如下代码:
 .xpand(style='height:200px;')
  canvas.illo(width='800' height='800' style='max-width: 200px; max-height: 200px; touch-action: none; width: 640px; height: 640px;')
script(src='https://fastly.jsdelivr.net/gh/xiaopengand/blogCdn@latest/xzxr/twopeople1.js')
script(src='https://fastly.jsdelivr.net/gh/xiaopengand/blogCdn@latest/xzxr/zdog.dist.js')
script#rendered-js(src='https://fastly.jsdelivr.net/gh/xiaopengand/blogCdn@latest/xzxr/twopeople.js')
style.
  .card-widget.card-announcement {
  margin: 0;
  align-items: center;
  justify-content: center;
  text-align: center;
  }
  canvas {
  display: block;
  margin: 0 auto;
  cursor: move;
  }
星空背景和流星特效
1、在 [Blogroot]\themes\source\js\ 目录下新建 universe.js 输入:
function dark() {window.requestAnimationFrame=window.requestAnimationFrame||window.mozRequestAnimationFrame||window.webkitRequestAnimationFrame||window.msRequestAnimationFrame;var n,e,i,h,t=.05,s=document.getElementById("universe"),o=!0,a="180,184,240",r="226,225,142",d="226,225,224",c=[];function f(){n=window.innerWidth,e=window.innerHeight,i=.216*n,s.setAttribute("width",n),s.setAttribute("height",e)}function u(){h.clearRect(0,0,n,e);for(var t=c.length,i=0;i<t;i++){var s=c[i];s.move(),s.fadeIn(),s.fadeOut(),s.draw()}}function y(){this.reset=function(){this.giant=m(3),this.comet=!this.giant&&!o&&m(10),this.x=l(0,n-10),this.y=l(0,e),this.r=l(1.1,2.6),this.dx=l(t,6*t)+(this.comet+1-1)*t*l(50,120)+2*t,this.dy=-l(t,6*t)-(this.comet+1-1)*t*l(50,120),this.fadingOut=null,this.fadingIn=!0,this.opacity=0,this.opacityTresh=l(.2,1-.4*(this.comet+1-1)),this.do=l(5e-4,.002)+.001*(this.comet+1-1)},this.fadeIn=function(){this.fadingIn&&(this.fadingIn=!(this.opacity>this.opacityTresh),this.opacity+=this.do)},this.fadeOut=function(){this.fadingOut&&(this.fadingOut=!(this.opacity<0),this.opacity-=this.do/2,(this.x>n||this.y<0)&&(this.fadingOut=!1,this.reset()))},this.draw=function(){if(h.beginPath(),this.giant)h.fillStyle="rgba("+a+","+this.opacity+")",h.arc(this.x,this.y,2,0,2*Math.PI,!1);else if(this.comet){h.fillStyle="rgba("+d+","+this.opacity+")",h.arc(this.x,this.y,1.5,0,2*Math.PI,!1);for(var t=0;t<30;t++)h.fillStyle="rgba("+d+","+(this.opacity-this.opacity/20*t)+")",h.rect(this.x-this.dx/4*t,this.y-this.dy/4*t-2,2,2),h.fill()}else h.fillStyle="rgba("+r+","+this.opacity+")",h.rect(this.x,this.y,this.r,this.r);h.closePath(),h.fill()},this.move=function(){this.x+=this.dx,this.y+=this.dy,!1===this.fadingOut&&this.reset(),(this.x>n-n/4||this.y<0)&&(this.fadingOut=!0)},setTimeout(function(){o=!1},50)}function m(t){return Math.floor(1e3*Math.random())+1<10*t}function l(t,i){return Math.random()*(i-t)+t}f(),window.addEventListener("resize",f,!1),function(){h=s.getContext("2d");for(var t=0;t<i;t++)c[t]=new y,c[t].reset();u()}(),function t(){document.getElementsByTagName('html')[0].getAttribute('data-theme')=='dark'&&u(),window.requestAnimationFrame(t)}()};
dark()
2、在 [Blogroot]\themes\source\css\ 目录下新建 universe.css 输入:
/* 背景宇宙星光  */
#universe{
  display: block;
  position: fixed;
  margin: 0;
  padding: 0;
  border: 0;
  outline: 0;
  left: 0;
  top: 0;
  width: 100%;
  height: 100%;
  pointer-events: none;
  z-index: -1;
}
3、在 [Blogroot]\_config.butterfly.yml 的 inject 配置项中 bottom 下填入:
inject:
  bottom:
+       # 星空背景
+    - <canvas id="universe"></canvas>
+    - <script defer src="/js/universe.js"></script>
4、在 [Blogroot]\_config.butterfly.yml 的 inject 配置项中 head 下填入:
“`diff
inject:
head:
+ ## 星空背景
+ –
相关文章